Wednesday, November 28, 2012

Way Finding Signage for Buckeye

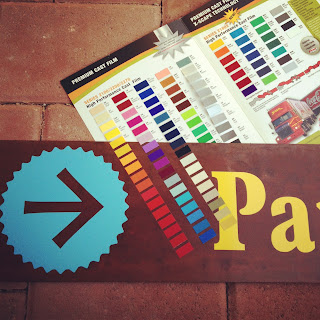
Today I am selecting font colors for Way Finding Signs for the Historic District in Buckeye, Arizona.  This project was first called to the attention of the Buckeye Main Street Coalition in February of this year.   Finally, they are being constructed by Motivational Systems Inc., a local signage company.

I want to make sure the font is more on the lighter side of things so it really reads against the dark rusted metal background.  We initially decided to go with the colors that make up the Town of Buckeye logo of pink, purple, blue and yellow.  It really works.

We selected materials such as contrasting rust stained steel in keeping with the look and feel of Buckeye.  The frames will be constructed with a rusted pipe steel and the panels will be made of a treated steel corrugated panel.  If you drive along MC85 you will see a patchwork of weathered building materials.  It is important to show there is progress with new construction but also a nod to the Buckeye heritage of using what you have on hand. 


Above is one of the many sun burnt weathered relics you will find along MC85 headed west.  

This is the former Eastman Cotton Gin that will continue to inspire future designs.  The best results come from up-cycled materials mixed with new when it comes to revitalization for Main Street Buckeye.

We incorporated aspects that we liked from the current welcome signage. The font is a standard for Down Town Buckeye.

Here is the final design that is being built. There will be 12 new monument and freestanding signs by the first of 2013 to help you navigate your way to Historic Buckeye.

Thursday, November 22, 2012

Pinky Promise


It was a dark and stormy night. I was beat and ready for bed as I roll tucked out of Lily's bunk and  she firmly commands me, "Mommy, I must have a toga for school tomorrow."  It was more firm than changing out batteries in her remote kind of tone.  She wanted to be ready for her third grade Greek party.  I sat back down on her bed and thought, "I have never made a toga!".  How hard could it be, I could just wrap her in a sheet.  Lily had jumped out of her bed and was putting on tights and her white tennis dress to be ready.  I was thinking of the gold leaf crown that seems very Greek. *did they really wear those?*  I didn't have silk green leaves or gold spray paint.  My mind was searching all my craft bin membrane for ideas. 

As my child was winding up with excitement and hope for a toga I remembered that I had gold metallic duck tape and pipe cleaners.  As I left her I looked at her and said, "I can't believe I am doing this." She quietly smiled as I was measuring her head with my sewing tape measure as she was trying to go to sleep. *her head is the same size as mine?*

I searched through the craft bins and pulled out wood clothes pins but that would be a pain to wrap with gold tape and too heavy.  I spotted the bag of egg carton cut ups that I almost threw away.  I took out my X-acto blade and just started cutting.  Did you ever realize how soft and easy it is to cut an egg crate? You should seriously try it with a fresh blade.

 I was done with the crown in 30 minutes!  I love when ideas come together easily using things on hand.  My little client was beaming in the morning!


I ended up making one for myself while Lily was at school and I had an order for another after I made an appearance at lunch.  This little girl in Lily's class asked so nicely that I couldn't say no.  She asked Lily if she could pinky promise that I would make her one.

Thanks to Ellie Marder I also had this 1960's killer necklace for the Toga Party - no I am not photo-shopping the diffuser out. I have sweet potatoes to go make. You are thinking how Greek my house looks...

So after I wore my crown all day *even to Costco* I bought every color of duck tape. Think of the possibilities...neon orange and turquoise crowns!  Lady Ga Ga will be calling!

Shoogey Doogey liked the pipe cleaners. 

Happy Thanksgiving!

Wednesday, November 14, 2012

What Makes You Creative

Yes, that is a paper clip box.  

Starting this model was not easy at all.  It took about three weeks to work myself up to breaking out the cardboard and coming up with 3 solid options.  If you know me by now, you know I hate 3 options too.  I can find every excuse not to start.

But deep down I know once I start I will feel so accomplished.
It's like laying a ultimatum on yourself, "If you don't start working on this cardboard gluing model project I will play One Direction on a loop!"  Work is life.  Work can be creative.  

All you need is a timer set to 15 minutes.  When I started this model I was stalling by throwing out socks that don't match.  At some point I set the timer for 15 minutes.  I tell myself that I have to work steady super focused for 15 minutes and when the timer dings I can do whatever I want for another 15 minutes. I continue this cycle until I reach the point when I want to keep working on my model.  When the timer is beeping and I want to throw a large stone at it so I can keep working I know I have arrived. 

Atget Paris, Bibliotheque Nationale Mission du Patriomoine Photographique Musee Carnavelet

In 15 minutes I found this shed roof on 21 Rue Mazarine, 1911 in the Quartier de la Monnaie. Not bad aye?  When you know you only have 15 minutes of intense focus, guess what....you focus.  It is crazy how that works!  So I jumped on that idea and built a whole concept for a storefront from that little slice in a book.  

When my desk top gets like this... I really don't need a timer.  When you look at the clock and an hour has passed and it seemed like 10 minutes, you are in the creative zone. Easy.

Random cats are attracted to my desk when I am in the creative zone.


The metal shed canopy with the jagged edge is so Historic Buckeye.  I think this is going to work.


So c...c..come on!

Thursday, November 8, 2012

Grain of Cardboard Can Work to Your Advantage

1. Drink strong tea out of a Tinkerbell mug.

Cutting cardboard with sharp blades started for me when I was about 9.  I have a past surrounded by tiny cardboard pieces and pools of glue.  I can remember cutting and gluing buildings out of boxes with no plan or specifications.  Seeing a big box still makes my heart sing! 

2. Spread the glue evenly with a brush.

I found this blue rigid insulation by Dow.  It was not easy getting this particular blue shade or trying to fit it in my car. The 8 foot long sheet was covered in a film of dirt after waiting centuries in some warehouse along McDowell Avenue in Phoenix.  It cuts really well if you have a hot wire cutter or a box cutter with a pack of sharp blades. You need to invest in X-acto when building a smart looking model.  

2. Use tape to secure the pattern before cutting.

It was a lengthy process of laminating chip board to the rigid insulation.  Some of it bowed out even though I pressed it with my heavy collection of books.

3. Press the laminated pieces under your most expensive books at least for 24 hours.

If you have a outdoor table with steel slats on the top it is a perfect place to laminate.  The slats will allow air to dry the pieces on both sides.  Even in this dry desert climate I saw some moisture STILL after 7 hours of drying with the laminations between a travertine floor and books on top.  Are you still reading this?

4. Model materials can be cut from any cardboard box lying around.

Don't be afraid to make mistakes.  There are countless things that went wrong with this model but I have to keep going. You can always rip it off and do it over, it's just cardboard.  Think of how the grain of the cardboard can work to your advantage.  If you are cutting out window mullions, cut against the grain so your vertical mullions don't collapse.  Two inch mullions at 1/2" scale is tricky to cut out.  My finger muscles are mad at me right now.  You know there are tons of muscles in your hand that are tensed when making a model?

5. Make sure you have plenty of sharp blades and change them out as soon as the tip cuts dull.

That blue thing I cut free form on the wire cutter.  I am super proud of it. It is supposed to be this huge cotton flower to be used as signage for signage.  Wire cutters are terrible for trying to cut straight lines in the rigid insulation. I ended up using my steel straight edge and the box cutter for straight lines.

6. If it is something small, go ahead and use a hot glue gun.

Hot glue guns are not recommended for laminating large pieces of board together for the simple reason that the glue dries in seconds. No time to spread it out with a toothbrush.  Hot glue gun is wonderful when you want something small to stick without fussing over the details. The storefront signage was glued with hot glue gun.  If only it was that easy in full scale!

7. Use only neutral colored building materials.

Paper bag brown, white, gray, white and sky blue are perfect for building models for architectural concepts.  The last thing you want your client to ask is "Is that the color you were thinking for the building?"  In the initial stages of design you want the client to stay conceptual with you.  I think my all time favorite is cardboard since it is so readily available.  You will be hard pressed to find light blue board in the last hour before your meeting.